It happens to most serious water skiers. You get to the point where just going out and kicking up a lot of spray on a single ski gets boring. Seeking a greater challenge, you start thinking of putting in a slalom course and maybe getting into competition. Setting up a course seems simple enough -- just 22 plastic buoys anchored to the bottom. Yet how do you go about anchoring them to the proper dimensions with some degree of accuracy?
Before we discuss bow to set out the buoys, let's consider where the course will go. You may already have in mind the most sheltered spot on your lake, river or reservoir that is free of backwash and out of heavy boat traffic. You must be aware, however. that the course will require considerably more water surface than just that for the course itself. The course is 850 feet (259m) long, but you should have a minimum of 600 feet (180m) of approach space on either end: at the very least, you should be looking at over 2,000 feet (600m) in length. Also. a regulation course is about 75 feet (23m) wide, but additional space. perhaps 100 feet (30m) more to either side, will be needed for safety, for a total minimum width of about 275 feet(85m) . Keep in mind that many states also have a minimum distance from shore within which powerboats can operate only at a no-wake speed. Then be sure that the water is at least five feet (1.5m) deep in the area during the time the course will be in use.
Before getting too deeply involved in the project, determine what permission you may need from government agencies. Some states' natural resource or environmental departments require that a permit be obtained before a slalom course can be anchored in public waters, and you may need the approval of the town or county in which the site is located. Also, on waters under federal control, you may require the approval of the managing agency such as the Army Corps of Engineers.
In some cases, a public hearing may be required on your request for a permit at which you may encounter resistance from those who oppose water skiing. On waters that are open to powerboating and water skiing, however, the addition of a slalom course should pose no real cause for alarm to anyone.
The buoys are safe and designed not to harm boats or skiers when struck accidentally. Also, despite some contention to the contrary, installing a slalom course does not represent the exclusive use of a portion of the water. Fishermen and other boaters have is much right to that space as the skiers, so common courtesy should dictate how and when the course will be used on a public waterway. If permits or other forms of official permission are required, initiate your request well in advance of the skiing season in case delays are encountered.
Once the coast is clear, you are ready to accumulate the materials that you will need. The best buoys are the official AWSA slalom buoys available through AWSA Headquarters. They are made of heavy tether-type plastic with strong molded attachment rings. The official course contains 22 buoys, generally red-orange for the skier turn buoys and the entrance and exit gates and yellow for the boat guide buoys. For a practice course you may wish to use anti-freeze bottles or other sturdy plastic containers. However, do not attempt to use plastic milk jugs, since they are not durable enough. Most skiers use quarter-inch thick polypropylene ski line for the anchor lines. It does not rot, stretch, or shrink. Be aware that knots in ski line can come untied easily so it is advisable to splice rather than tie the line, especially at the anchor.
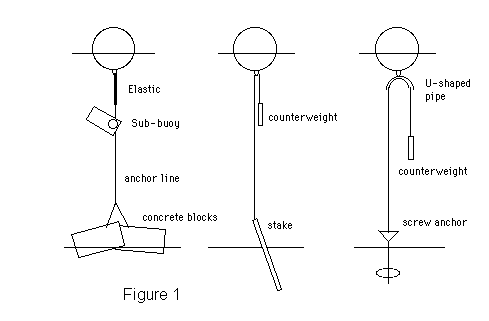
The anchoring method used and the amount anchor line and other materials required depend upon the depth of the water and the amount of water level fluctuation expected. With minimal fluctuation, the recommended method is to anchor sub-buoys about three feet below the surface and attach the surface buoys to them with about a foot and a half of some type of elastic. The elastic keeps the anchor line taut and the buoy directly over the anchor and allows for a 6 to 12 inch (15 to 30 cm) variation in water level. The least expensive elastic that has proven effective is a strip of inner tube. Stout shock cord and latex surgical tubing have also been used successfully. Should a surface buoy come off. you have simply to look for the sub-buoy not far below the surface rather than diving to the bottom to find the anchor. Sub-buoys that are fluorescent orange or white are most easily seen from the surface.
An additional advantage of using sub-buoys is that the surface buoys can be removed. during the winter for instance, and then replaced with relative ease. Many skiers have used various sorts of plastic or non-corroding metal clips and hooks to make the job of buoy removal and replacement fast and simple. If you use plastic bottles such as half-gallon milk containers for the sub- buoys, fill them with foam to ensure buoyancy should the containers be punctured.
The most common anchor for slalom buoys is a pair of concrete building blocks. One block may be sufficient on a soft mud bottom. Poured concrete anchors are also commonly used. If fraying of the anchor line where it goes around the anchor could be a problem. use a length of 2 inch (5 cm) garden hose to prevent chafing . For a permanent installation, consider using screw anchors or metal stakes driven into the bottom.
On reservoirs, tidal bays and other waters which experience fairly substantial water level variations. it may be necessary to equip each buoy with a counterweight to keep the anchor line tight (see Figure 1). Suitable counterweights can be made from plastic bottles filled with a sufficient amount of sand. Some have used half-pieces of brick, lead sinkers or sash weights. If currents tend to wrap the counter- weight around the main anchor line and prevent it from moving up and down freely U-shaped pieces of plastic or metal tubing can be used to separate the two lines, as shown in Figure 1.
A number of methods can be used to fix the location of the buoys. For the ultimate in accuracy, a surveyor with a transit on shore can sight the proper buoy positions while swimmers place the anchors. In northern climes the anchors and sub-buoys can be set in accurately through the ice. Most skiers, however. will want to install their courses with simple tools during the spring or early summer.
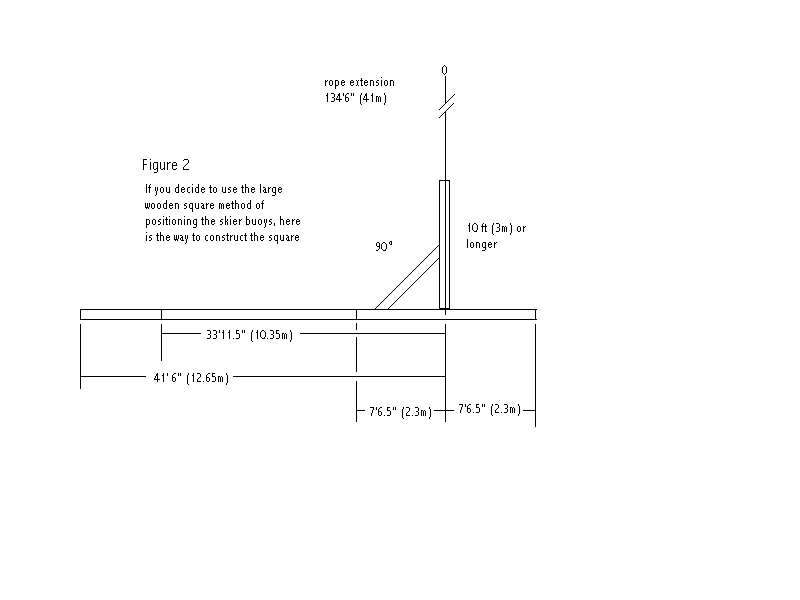
A common and relatively easy method of warm weather installation involves the use of a large wooden square. The square, shown in Figure 2, can be made of straight 2X4's (5cmX10cm - standard size building lumber) bolted together with marks painted at the specified measurements. The rope extension is optional, but it will help in positioning the square when it is in use.
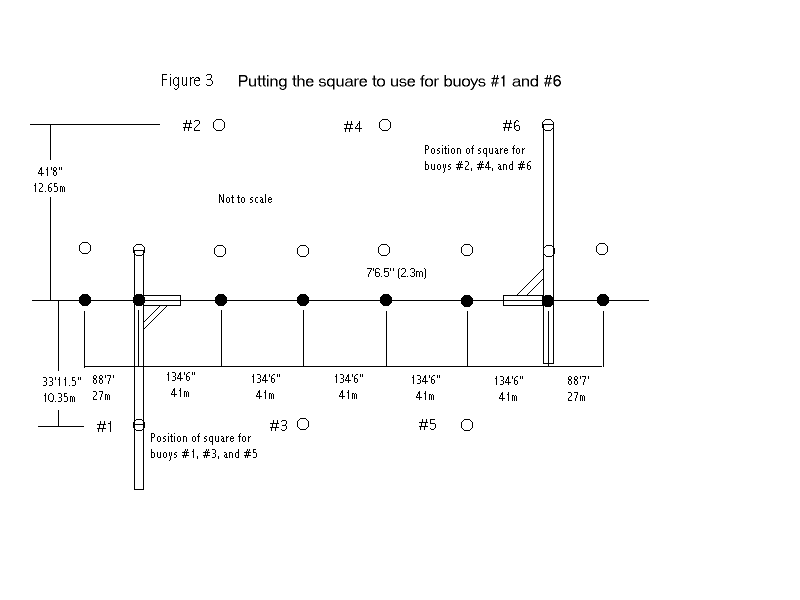
With your square constructed, the next step is to set out a straight line of six boat guide buoys. (Note that the end gates are slightly wider, 2.5m vs. 2.3m. You make a line of 8 buoys and adjust the width at the end)
You should have two or three strong swimmers in life jackets and/or wetsuits and one or two helpers in a boat to prepare the anchor-and-buoy rigs, drop them overboard where required, and to help with the visual alignment of the buoys. The swimmers may find that swim fins are very helpful during their time in the water. Make sure you have all of your needed materials and tools in the boat before starting.
First. anchor a buoy where you want one end of the course to begin. Next. anchor a temporary buoy approximately where the opposite end of the course will be to help establish a directional line. Working from your first buoy, it is relatively simple to measure the proper distance to the next buoy and to the others in succession by using pre-measured lengths of rope. By sighting down the row of buoys, a helper in the boat can tell the swimmers how to position the buoys to make a straight line.
Your line of buoys will now serve as a reference line from which the square is used to determine the correct perpendicular distance to the skier buoys and the second line of boat guide buoys. For skier buoys #1, #3 and #5, float the square in the position illustrated in Figure 3 at the second buoy in your line. Align the short arm of the square with your line of buoys. For greater accuracy in making this alignment, have another swimmer hold the rope extension with a slight tension at the next buoy in your line. When the long arm of the square is perpendicular to the line of buoys. anchor both the skier buoy at the 33' 11 1/2" (10.35m) mark and the other boat guide buoy at the short end. Repeat this procedure for skier buoys #3 and #5. Visually check your work to make sure that the new buoy lines you have just set out are straight.
Now you are ready to install skier buoys #6, #4 and #2 on the other side of the course as well as the remaining boat guide buoys. Continue to use your original line of eight as your reference line. When the square is in perpendicular position for #6 skier buoy, anchor buoys at the 41' 6" (12.65m) mark and at the 7' 6 1/2in (2.3m) mark. Repeat for #4 and #2. Visually check all four buoy lines of the completed course and reposition any buoys that may be slightly out of line.
Since the distance between the end gate buoys is eight inches wider than that of the course guide buoys. at this point move the end gate buoys out four inches and you have an official course.
Following the technique outlined above, you should have little trouble installing your course in water of reasonable depth. Obviously if the water is very deep, accurately positioning 22 buoys with individual anchors can be very difficult if not impossible. Also, if you would like to move the course to a different location or if you must put in a course at a site for temporary use, such as at a tournament. you must go through the entire routine again.
Fortunately, the invention of several commercially-available submerged cable slalom courses has largely solved these problems. Essentially these systems consist of a single cable with six rigid boom arms or several parallel cables that are submerged five or six feet under water and anchored by single large anchors on either end. The tension of the anchor lines and the upward buoyancy of the buoys assures a stationary and accurate course. The fact that a cable course can be installed quickly at almost any given site, and just as quickly changed in position or removed altogether, is justification enough for many water ski clubs and individual skiers to invest in the device if their needs call for such flexibility.
Otherwise, for a small expenditure in materials, time and effort, you can make your water skiing the ongoing challenge that is the real fun of the sport.